Deploying Parse Dashboard
Below are steps that I’ve taken, myself, to deploy the [Parse Dashboard][1] to a cloud host, such as Azure, or Heroku.
Before you worry with a cloud host, you need a copy of the parse-dashboard to prepare for deployment…
1 – Clone parse-dashboard git repository
First, you’ll want to clone (or fork, then clone) the [parse-dashboard git repository from GitHub][1].
I typically make folders in my ~/Developer directory for projects that I’m working on. You can make the directory in Finder, then open Terminal and cd into it. Or you can just run mkdir in Terminal and then cd into it.
Once the directory for your parse dashboard is created, run the following command.
git clone https://github.com/ParsePlatform/parse-dashboard.git
2 – Run npm install
Once the repository has been cloned to your local machine, change directory (cd) into the ‘parse-dashboard’ directory. You can run ls at the Terminal to list out the contents of the directory you just cloned the dashboard repository into and you should see a new directory named ‘parse-dashboard’. That’s the one you need to be inside next.
So, in the ‘parse-dashboard’ folder, run npm install at the Terminal. It could take a minute or three for the installation of all the Node packages to complete.
3 – Edit parse-dashboard-config.json
After the npm package installation in Step 3 is complete, you need to cd into the ‘Parse-Dashboard’ directory to find the parse-dashboard-config.json file. Note the capitalization of ‘Parse-Dashboard’. Earlier you cd‘d into the ‘parse-dashboard’ (lower-case) directory. Well, there’s another directory inside named exactly the same, only the ‘P’ and the ‘D’ are capitalized.
You can run ls inside ‘Parse-Dashboard’ and should see parse-dashboard-config.json in there. If you don’t, you’re probably not in the right directory. At this point, you could actually be in Finder to locate the file if you’re more comfortable there. Just run open ., and you’ll be in a Finder window at the directory you’re in inside the Terminal. Then you can just double-click the configuration file to open it up in a text editor.
Once you have it open, you need to have a few pieces of information about your self-hosted Parse server handy:
- Your Parse Server’s URL
- Your App ID that’s configured on your Parse Server
- Your Master Key that’s configured on your Parse Server
- Your App’s Name (can be an arbitrary value)
Adjust your Parse Dashboard’s configuration file as follows with the values you’ve gathered:
{
"apps": [
{
"serverURL": "http://url-to-your-parse-server/parse", // If your Parse Server's endpoint is not at /parse, you need to replace /parse with the correct endpoint
"appId": "your-app-Id",
"masterKey": "your-master-key",
"appName": "your-app-name"
}
],
"users": [
{
"user":"username1", // Used to log in to your Parse Dashboard
"pass":"password1"
}
]
}
```
# 4 – Modify local .gitignore
Your local .gitignore file ignores some needed directories that, while helpful to ignore in the actual Open Source parse-dashboard repo on GitHub, are _not_ as helpful to ignore when you need to deploy the dashboard to a cloud host.
Edit the .gitignore file using a text editor and remove these three lines:
bundles/
Parse-Dashboard/public/bundles/
Parse-Dashboard/parse-dashboard-config.json
```
# 5 – Stage and commit all changes
Stage all of the changes you've made to the parse-dashboard-config.json and the .gitignore files, and add the files and directories that were previously ignored by git by running `git add -A`
Then commit the staged changes:
`git commit -m "Prepared app for deployment"`
# 6 – Set up private git repository
Since you're storing values that are intended to be kept secret (such as your app's Master Key), you need to set up a private git repository that can be used for two purposes: 1) To keep your configuration under source control and 2) to be able to use as a deployment source for your cloud host provider.
The idea is that you can wire up your cloud app in Azure/Heroku/AWS/wherever to refresh itself every time you commit code to the master branch of this private repository. It's really handy for making updates.
[Bitbucket][2] offers its members unlimited private repositories, so that's where I've chosen to host mine.
# 7 – Add new remote to your local parse-dashboard git repository
With the new private repository set up, you need to add it as a remote to your local parse-dashboard repo.
In the Terminal, make sure you're in the directory of your local parse-dashboard git repository and run:
git remote add privateorigin https://url-to-your-private-parse-dashboard-repo
```
# 8 – Push to your private git repository
With all the changes to your configuration committed and the new remote repository added, you can push those changes up to that repo:
In the Terminal, make sure you're in the directory of your local parse-dashboard git repository and run:
git push -u privateorigin --all # pushes up the repo and its refs for the first time
git push privateorigin --tags # pushes up any tags
```
# 9 – Create app on the cloud host
Now you need to create a new app in your hosting provider of choice. I typically go with [Azure][3], because I'm most familiar with it. I also like that they offer a completely free option, though if you want to really run this stuff for a larger-scale "production” or "enterprise” app, it's going to cost no matter where you choose to host it.
The cloud host may want to know what flavor of app you want to create. In the case of parse-dashboard, it's a Node.JS app.
# 10 – Configure cloud host for git deployment
Once you've created a new Node app on your cloud host of choice, you need to configure it for git deployment.
This step will be different for each cloud host, but the general idea is that you should be able to configure your private git repository that you set up in Step 5, to be the source from which the cloud host will go out, grab the code, and perform the necessary steps to get the Parse Dashboard bootstrapped for access.
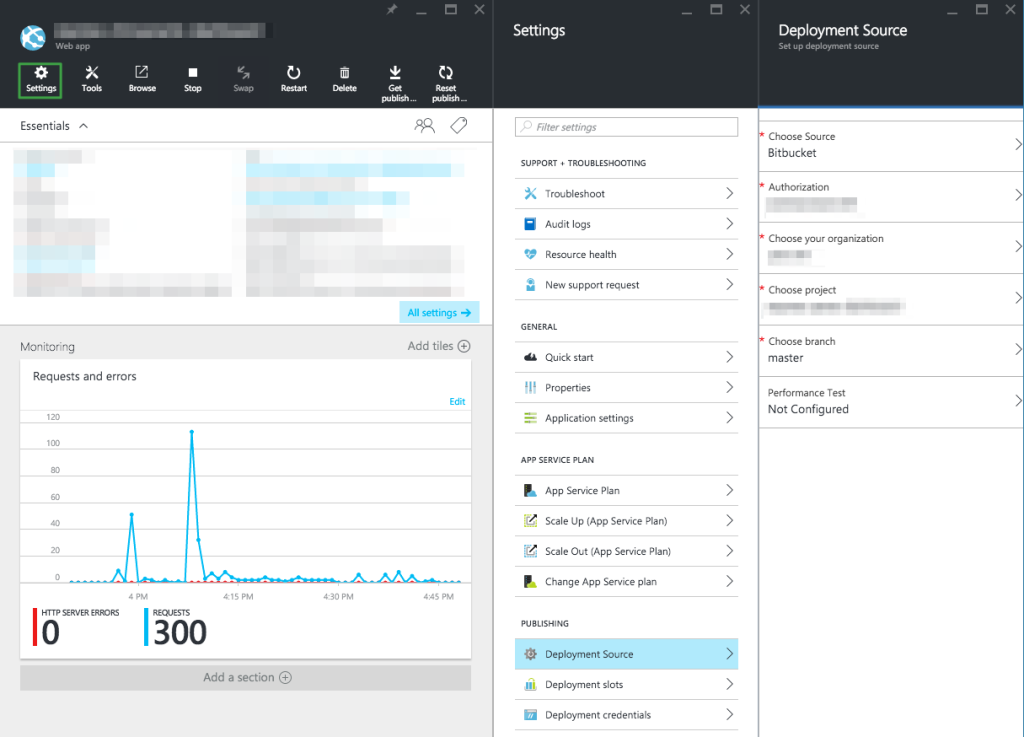
In Azure, you simply click on your app, and configure git deployment in the Deployment Source settings:
[ ][4]
You might check out [Heroku's startup guide][5] for help on deploying to their service.
Note that instead of doing the git deployment option, you could always FTP your whole parse-dashboard directory (the one that you cloned and ran `npm install` inside), if your cloud host supports this deployment option.
# 11 – Enable SSL (or run as insecure app)
If you access your app after you've deployed it to your chosen cloud host, you'll likely run into an error page stating that "Parse Dashboard can only be remotely accessed via HTTPS”.
Configuring SSL is beyond the scope of this walk-through, but that would be the next step if you chose to do it for your production app. Note that on Azure, your App Service Plan needs to be at "Basic” or above. Heroku charges a monthly fee to set up an SSL endpoint as well.
If you choose not to afford it or if you just want to test things out in the deployed environment to see if it's working or not, you can set up an environment variable in your app's settings on the cloud host.
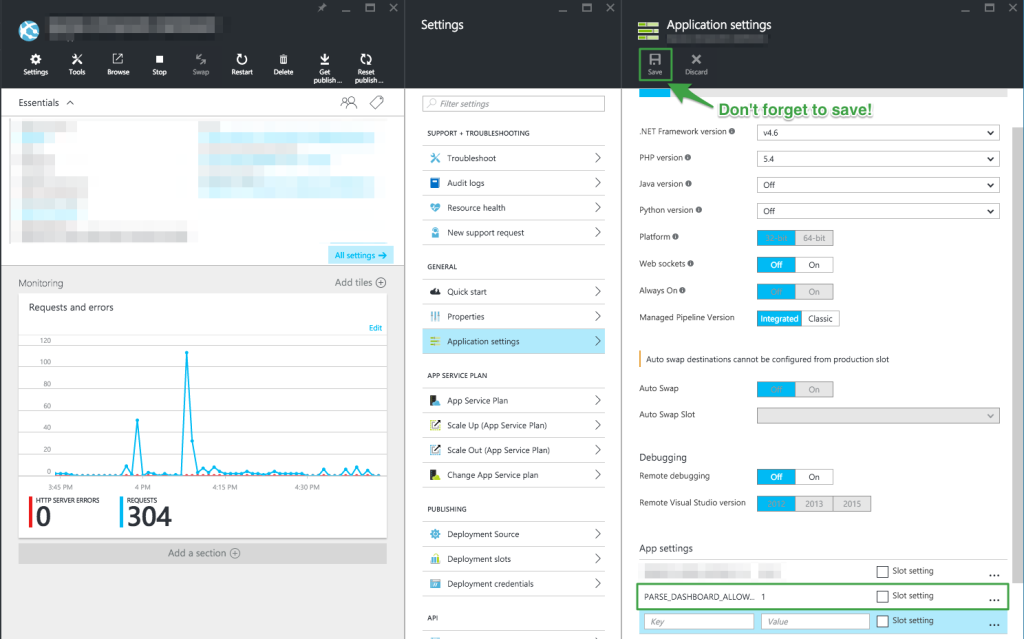
In Azure, you need to choose your app, then go to "Application Settings” in the Azure Portal. Then add a new key-value pair under App settings: PARSE\_DASHBOARD\_ALLOW\_INSECURE\_HTTP is the key, and 1 (the number 1) is the value:
[
 ][6]
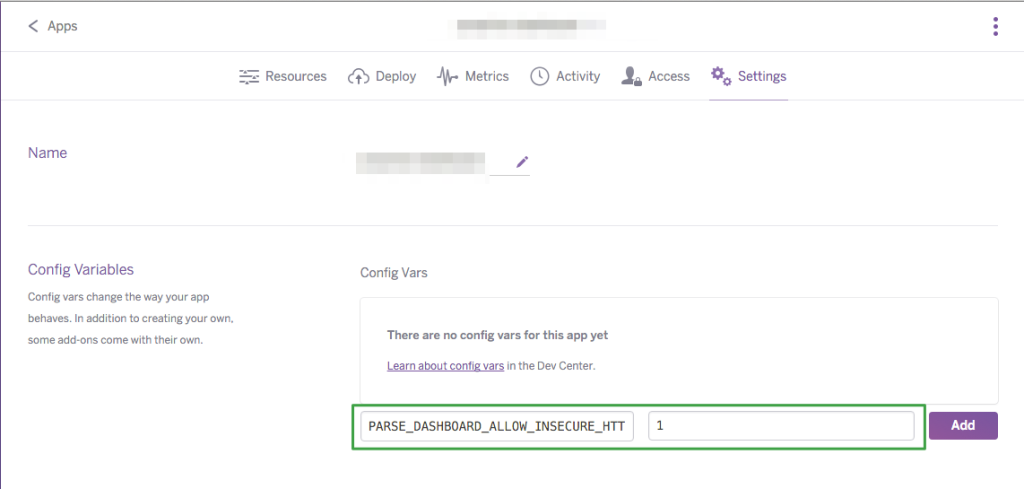
In Heroku, you need to go to your app's Settings, and then add a new Config Var with the same key-value pair:
[
 ][7]
You might also enjoy…
[1]: https://github.com/ParsePlatform/parse-dashboard
[2]: http://www.bitbucket.com
[3]: https://azure.microsoft.com/en-us/
[4]: https://www.andrewcbancroft.com/wp-content/uploads/2016/04/AzureGitDeployment1.png
[5]: https://devcenter.heroku.com/articles/getting-started-with-nodejs#introduction
[6]: https://www.andrewcbancroft.com/wp-content/uploads/2016/04/AzureAppSettings1.png
[7]: https://www.andrewcbancroft.com/wp-content/uploads/2016/04/HerokuConfigVars.png