Beginner’s Guide to Event Kit in Swift – Requesting Permission
Updated on October 26, 2016 – Swift 3.0
EventKit provides a set of classes for accessing and manipulating a user’s calendar events and reminders. In the tutorial that follows, my goal is to walk you through the first steps of setting up an app that utilizes EventKit. I will demonstrate how to request permission to the user’s calendar and show a couple of examples for how to handle the user’s response (for when they grant access, or deny it).
Note: Code in the main article below is written in Swift 3.0, but code examples for Swift 2.3 are found in the example project.
Example scenario
Let’s start by proposing a basic scenario to serve as this tutorial’s example.
Suppose that we’re building an app that, for now, has a single View Controller. We’d like this View Controller to display a list of calendars if the user grants us permission to do so. If they deny permission, we’d like to show a message to them that indicates that our app can’t function without this permission, and we’ll allow them to click a button to grant us permission in the Settings of their device.
I’ve created such an app as an example – jump over to GitHub to grab the code and explore. Read on for an explanation of some of the finer points of the setup and code.
Storyboard setup
One of the first things you’ll deal with in EventKit is the need to set yourself up with a UI to handle the different responses that the user can give you on that first application launch when you ask, “Can we access your calendar?”. We’ll get to the particulars of how request that permission shortly. But first, let’s dissect how we might arrange a Storyboard with some views that do the right thing for a given response to that permission prompt.
The user can either grant permission, or deny permission to interact with their calendar or reminders. We need to be prepared for either scenario.
Tableview for the calendar list for when access is granted
I’m feeling optimistic today, so let’s begin with the case where the user grants us permission to their calendar from the get-go.
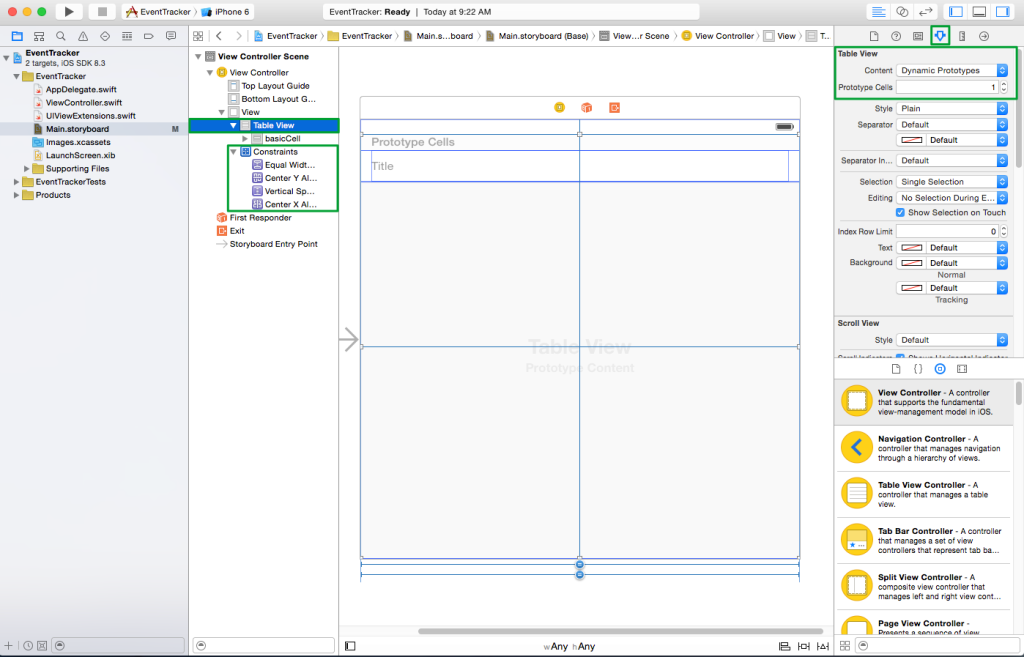
When the user grants us permission, we’d like to list out their calendars inside a table view. We’ll worry with setting up the data source later in the tutorial. For now, we’ll drag over a table view from the Utilities pane.
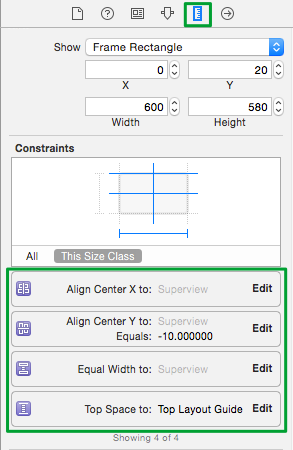
To get the table view to fill the whole screen, I do a couple of things. Usually, when you drag one out from the Utilities pane, the table view will fill the whole scene in the Storyboard. From that layout, I drag the top edge down until it “snaps” to the line where I’d expect the bottom of the status bar to be positioned. Then I set the following constraints:
- Center X
- Center Y
- Equal width to Superview
- Top space to Top Layout Guide for height.
I’ve created a short screencast on setting up a table view if you’d like a complete walkthrough:
Here’s a detailed view of the constraints, along with a visual of what the Storyboard Scene looks like with the table view installed:

As a final note, I’ve set the hidden property of the table view to true in the Storyboard. I’ll toggle the table’s visibility based on the user’s granting or denying of the calendar access later, but I thought it was worth pointing out that the initial state of my table view in the example is hidden.
“Need permission” view for when access is denied
There will be times when a user denies access to the calendar before realizing that doing so essentially stops all the functionality provided by your app. If your entire app, or even just a portion of it requires access to function, you need a way to inform the user of this, and provide them a way to navigate to settings and grant access manually if possible.
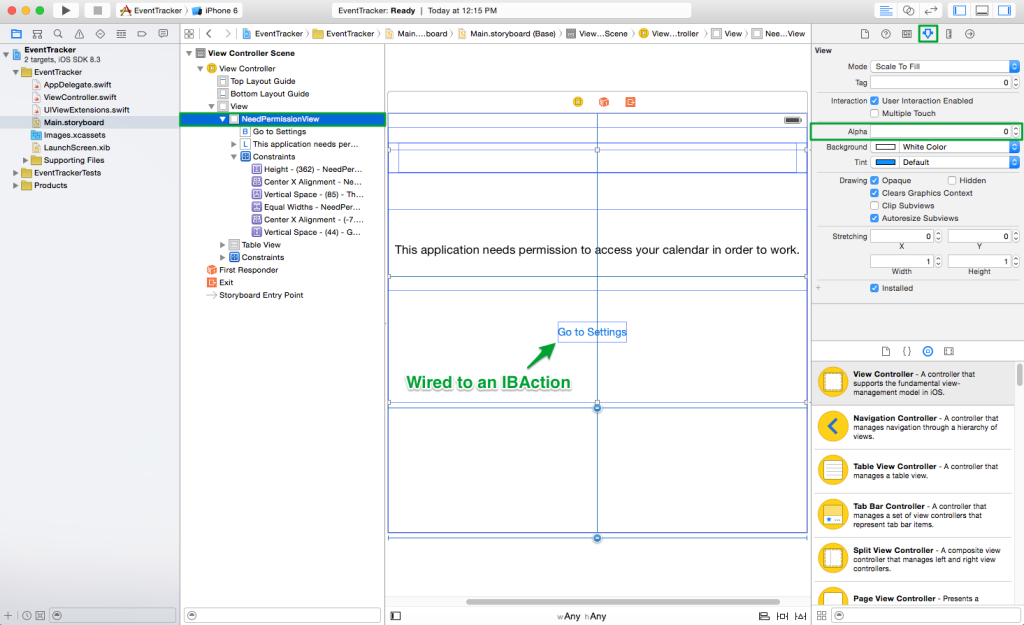
The way I did this in the sample project was to organize a new View onto the Storyboard Scene which contains a label with some instructions, and a button that takes the user to the Settings page for our app when they tap on it.
Once again, some constraints are involved in getting things to appear correctly at run-time. I won’t go into the details of this here, since it’s likely that every implementation of this will be slightly different.
One thing I will point out though, is that the View’s alpha has been set to 0 so that I can perform a nice fade in transition if the user denies access. Here’s a look at the Scene with the invisible “NeedPermissionsView” installed:
The role of the Event Store
At the heart of EventKit is the EKEventStore. EKEventStore is the central “thing”. Creating an instance of EKEventStore provides developers with an API for performing various read/write operations on the user’s calendars and reminder lists.
A View Controller that interacts with the calendar should hold a reference to an EKEventStore instance. It’s easy to create one – here’s an example:
1class ViewController: UIViewController, UITableViewDataSource, UITableViewDelegate {
2
3    let eventStore = EKEventStore()
4
5    // ...
6}
Checking for calendar authorization
Once we have a reference to an EKEventStore instance, we can use it to do things like check whether or not the user has granted us permission to use their calendar. From there, we can make decisions about whether or not we need to request permission, and subsequently figure out which view to show (the table view or the need permission view).
Where we check for calendar authorization is important. My recommendation is to check each time the view appears (ie, in viewWillAppear(), because it’s completely possible that the user could grant access at first, switch to settings, and deny access. Our app would need to respond appropriately.
In the example project provided with this article, I’ve created a function named checkCalendarAuthorizationStatus(). Here a peek at what it does:
 1class ViewController: UIViewController, UITableViewDataSource, UITableViewDelegate {
 2
 3    // ...
 4
 5    override func viewWillAppear(animated: Bool) {
 6        checkCalendarAuthorizationStatus()
 7    }
 8
 9    func checkCalendarAuthorizationStatus() {
10        let status = EKEventStore.authorizationStatus(for: EKEntityType.event)
11
12        switch (status) {
13        case EKAuthorizationStatus.notDetermined:
14            // This happens on first-run
15            requestAccessToCalendar()
16        case EKAuthorizationStatus.authorized:
17            // Things are in line with being able to show the calendars in the table view
18            loadCalendars()
19            refreshTableView()
20        case EKAuthorizationStatus.restricted, EKAuthorizationStatus.denied:
21            // We need to help them give us permission
22            needPermissionView.fadeIn()
23        }
24    }
25
26    // ...
27}
The key function here is EKEventStore's authorizationStatus(for:) function. Passing in EKEntityType.event is what corresponds to the user’s calendar. If we wanted to check for access to their reminders, we’d use EKEntityTypeReminder.
The possible EKAuthorizationStatus enumeration values are simply switched over – the logic to be performed is encapsulated in separate functions for ease of readability.
Let’s step through each of those functions one by one…
Update Info.plist for iOS 10 support
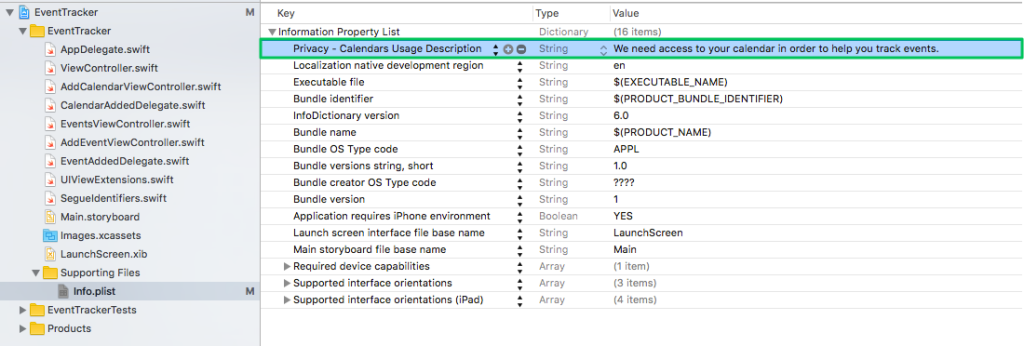
Apple now requires us to have a key/value pair in Info.plist that provides a description to the user as to why our apps need access to their calendar.
To set this value, open your Info.plist file, and add a new key for “Privacy – Calendars Usage Description”:

The value that you provide for this plist key ends up being displayed in the alert that’s displayed when you request access.
Requesting access to calendars
As the title of this tutorial suggests, all things start here. Whenever our application loads and we call authorizationStatus(for:), the status that will be returned is notDetermined. It’s at this point that we’d like to request access to the calendar.
To do so, let’s dissect the requestAccessToCalendar function:
 1class ViewController: UIViewController, UITableViewDataSource, UITableViewDelegate {
 2
 3   // ...
 4
 5    func requestAccessToCalendar() {
 6        eventStore.requestAccess(to: EKEntityType.event, completion: {
 7            (accessGranted: Bool, error: Error?) in
 8
 9            if accessGranted == true {
10                DispatchQueue.main.async(execute: {
11                    self.loadCalendars()
12                    self.refreshTableView()
13                })
14            } else {
15                DispatchQueue.main.async(execute: {
16                    self.needPermissionView.fadeIn()
17                })
18            }
19        })
20    }
21
22    // ...
23}
Our EKEventStore instance provides a function called requestAccess(to:). Once again, passing in EKEntityType.event is what signals that we’re requesting access to the calendar. The rest of the interesting parts are found in the completion closure that we provide.
There are three main things to note with this portion of the implementation:
- The two parameters that are passed in to the closure is a
Boolindicating access was granted (true) or denied (false). The second is anNSError. - We need to call
dispatch_async()and indicate that we want to jump back over to the main queue to execute our UI refreshes. self.needPermissionView.fadeIn()utilizes aUIViewextension from my post, Fade In / Out Animations as Class Extensions in Swift.
Access granted! Load calendars and refresh table view
When access is granted, we can call the eventStore instance’s calendarsForEntityType function and pass it EKEntityType.event to grab an array of the user’s calendars to display in our table view. Here’s a look:
 1class ViewController: UIViewController, UITableViewDataSource, UITableViewDelegate {
 2
 3    // ...
 4
 5    var calendars: [EKCalendar]?
 6
 7    // ...
 8
 9    func loadCalendars() {
10        self.calendars = eventStore.calendars(for: EKEntityType.event)
11    }
12
13    func refreshTableView() {
14        calendarsTableView.isHidden = false
15        calendarsTableView.reloadData()
16    }
17
18    // ...
19}
Access denied – Show needs permission view
When access is denied, we need to unveil the “Needs Permission View” we created in our Storyboard Scene.
Recall that in that view, there’s a button to direct the user to the Settings page for our app so that they can easily grant access to the calendar from there. That button is wired up to an IBAction. Here’s an example implementation of that IBAction:
 1class ViewController: UIViewController, UITableViewDataSource, UITableViewDelegate {
 2
 3    // ...
 4
 5    @IBAction func goToSettingsButtonTapped(_ sender: UIButton) {
 6        let openSettingsUrl = URL(string: UIApplicationOpenSettingsURLString)
 7        UIApplication.shared.openURL(openSettingsUrl!)
 8    }
 9
10    // ...
11}
Wrapping up
That pretty much completes the setup process for working with Event Kit! The remaining cases for the checkCalendarAuthorizationStatus() function simply re-use the functions I just dissected when exploring the requesting permission process.
I encourage you to head over to GitHub and dive into the code for yourself as you get started with utilizing Event Kit in your app!

