I am the author of Core Data Fundamentals with Swift, CloudKit, iOS Data Persistence: The Big Picture, and eight other courses on Pluralsight.
Deepen your understanding by watching the courses!
Displaying Data With NSFetchedResultsController and Swift
The combination of an NSFetchedResultsController and a UITableView provides a powerful way to integrate Core Data with a user interface. The greatest benefits of using NSFetchedResultsController come when we use it to automatically update a table view when objects are added, updated, or removed from a Core Data data store. First things first, though…
With a Core Data data store seeded with data, the next logical step is to display that data somewhere other than the console. This post will be devoted to figuring out how to set up an NSFetchedResultsController to display data inside a UITableView.
A follow-up post has been published to help you keep the table view in sync with the data as it changes in your persistent store, so once you’re finished here, you might check out that next step!
Final goal
NSFetchedResultsController will help us accomplish two things:
- It will fetch data from the Core Data data store
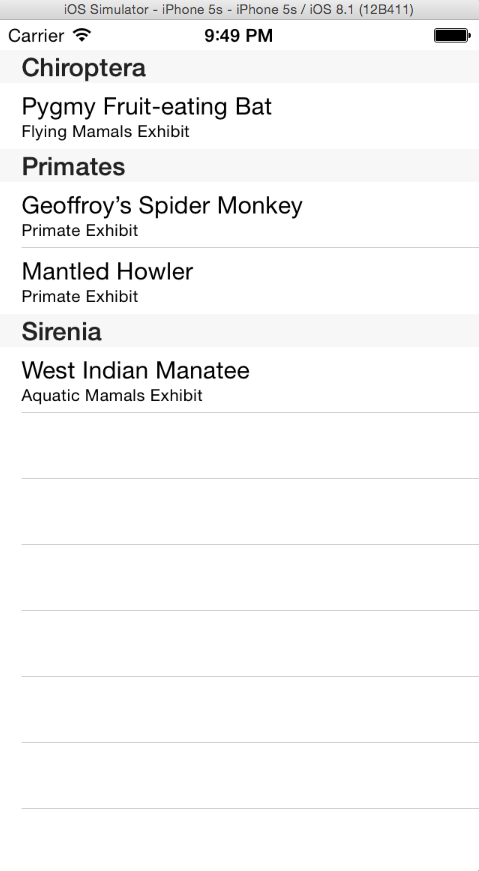
- It will use some of the data we fetch to populate various pieces of the UI (table view section headers, cell “title” and “subtitle” text. Here’s what we’re going for:
Setup and resources
I’m continuing my “Zootastic” example that I used to write about using Swift to seed a Core Data database. In fact, I’ve simply branched the project on GibHub and added the things we’re exploring in this post.
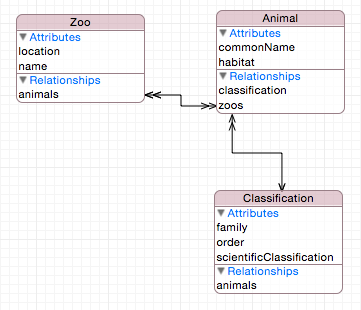
For this entry, we’ll still be dealing with our three primary NSManagedObject subclasses: Zoo, Animal, And Classification:
Storyboard
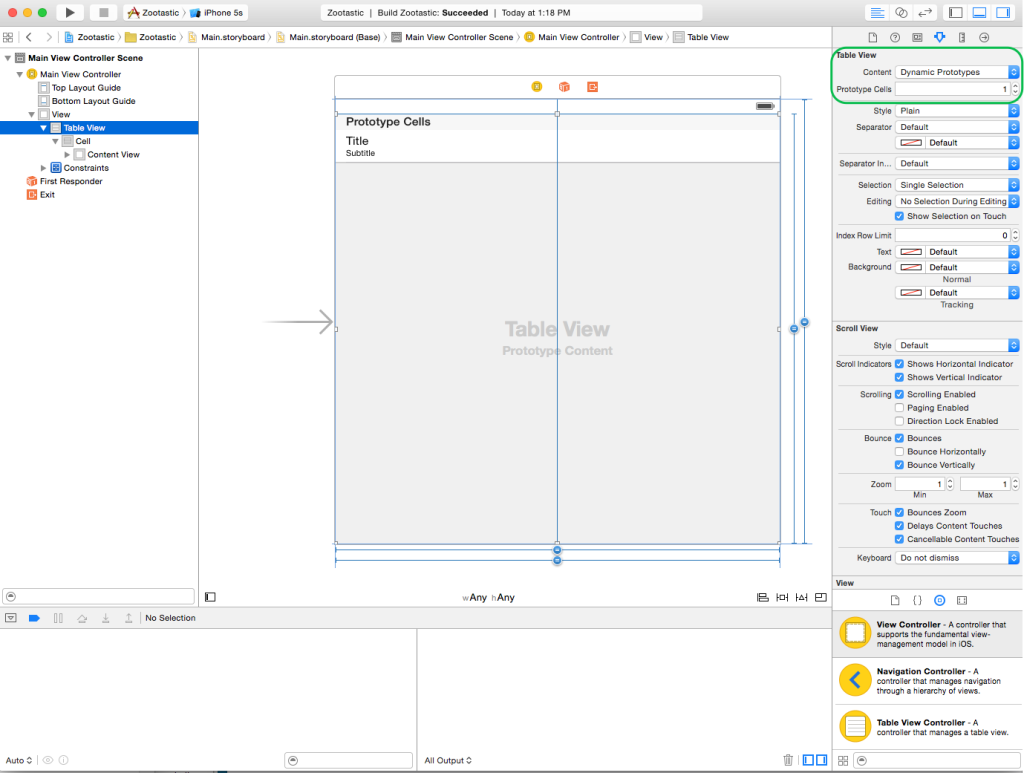
Zootastic is a single view application. The Storyboard contains one view controller with a table view filling the Scene.
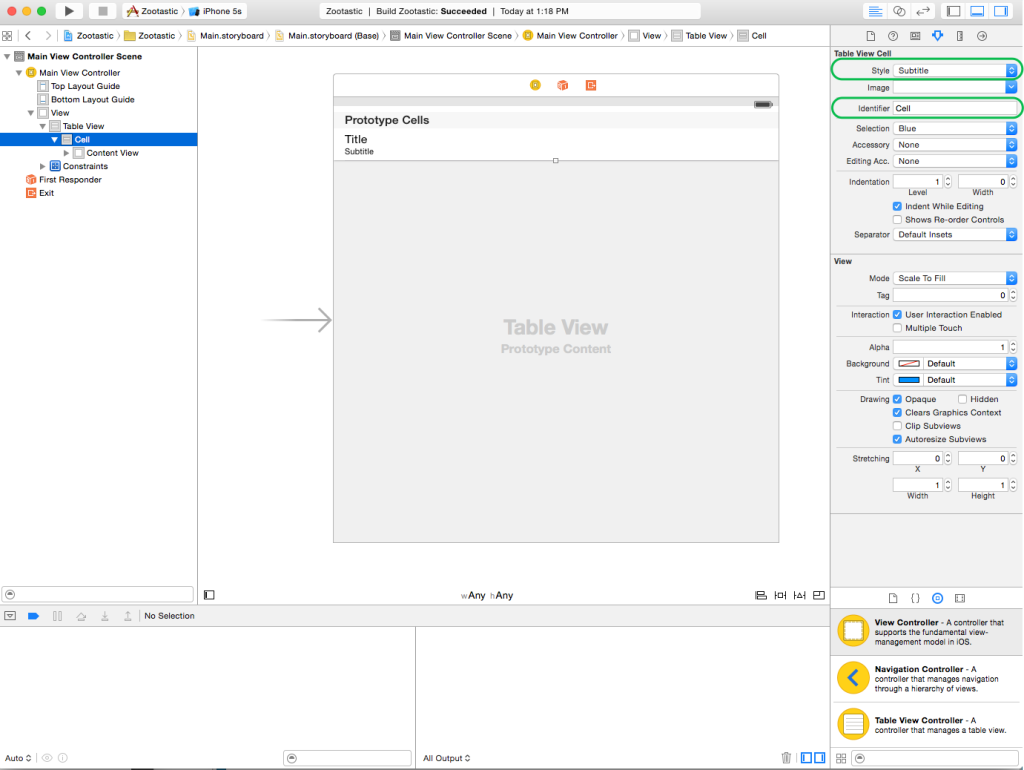
The table view is using one prototype cell with an Identifier of “Cell” (for simplicity). The Style of the prototype cell is set to Subtitle.
MainViewController.swift
MainViewController.swift is where the action is happening. Here’s a quick outline of what we need to accomplish in this class:
|
|
MainViewController is a class concerned with being the table view’s data source and delegate. Additionally, it will serve as the NSFetchedResultsControllerDelegate. For this post, we won’t actually need the fetched results controller delegate functionality to display data. Those methods are particularly useful for synchronizing things when data changes.
With the class declaration out of the way, we’ll investigate the class implementation one section at a time.
Maintain NSManagedObjectContext instance reference
|
|
application:didFinishLaunchingWithOptions method. More on this, shortly…
For now, know that we’re counting on that later step to take place, since context is defined as an implicitly unwrapped optional.
Create and configure NSFetchedResultsController instance
Next, we need to create and configure an NSFetchedResultsController instance. Here’s a bit of code with comments to follow:
|
|
Within the closure expression, I’m setting up a fetch request with some sorting applied. All that’s left is to initialize the NSFetchedResultsController, set its delegate and return it.
viewDidLoad()
Once the view has loaded, the idea is to perform the NSFetchedResultsController instance’s fetch request so that it has data to use in our UITableViewDataSource methods. This is how to do it:
|
|
UITableViewDataSource methods
The final step in implementing MainViewController is to set up the table view so that it pulls data from fetchedResultsController. I’m implementing the standard UITableViewDataSource methods here, along with tableView:titleForHeaderInSection. Take a look:
|
|
Apart from a bit of if let ___ = ___ syntax, there’s not an awful lot of surprising code here if you’re familiar with working with table views. I’ve highlighted the relevant code related to fetchedResultsController. Without using NSFetchedResultsController, you’d probably supply data to the table view from an array or a dictionary or both. The fetchedResultsController code simplifies the data display dilemma when you’re using Core Data.
Once the UITableViewDataSource methods are implemented, the implementation of MainViewController is complete for this example.
AppDelegate.swift
There’s one final thing we need to do in order to get things rolling. In the “maintain NSManagedObjectContext instance reference” section of this post, I mentioned the strategy for assigning the NSManagedObjectContext instance in the MainViewController. Here’s how I do it:
|
|
Note: With iOS 13, the code to assign the managedObjectContext to the root view controller needs to go in your app’s SceneDelegate.
The portion new to “injecting” the managedObjectContext into MainViewController is highlighted. I simply grab a reference to the rootViewController (which in our example is the MainViewController) and cast it to the appropriate type. Then I set the context property to the managedObjectContext that’s created in the AppDelegate via Xcode’s auto-generated Core Data stack setup.
Wrapping up
If you’re using Core Data in your iOS application, the combination of an NSFetchedResultsController and a UITableView provides a powerful way to integrate data from your data store into your UI. We’ve explored how to display data in a table view using NSFetchedResultsController. Feel free to grab the GibHub project for further investigation and to see Zootastic in action.
